“You have been logged on with a temporary profile. You cannot access your files and files created with this profile will be deleted when you log off. To fix this, log off and try logging on later. Please see the event log for details or contact your system administrator.”

You receive this error message when logging into a Windows Server 2008 R2 machine:

“You have been logged on with a temporary profile. You cannot access your files and files created with this profile will be deleted when you log off.  To fix this, log off and try logging on later.  Please see the event log for details or contact your system administrator.”

1

Try following these steps and check if it helps:

Important: This section, method, or task contains steps that tell you how to modify the registry. However, serious problems might occur if you modify the registry incorrectly. Therefore, make sure that you follow these steps carefully. For added protection, back up the registry before you modify it. Then, you can restore the registry if a problem occurs. For more information about how to back up and restore the registry, click the following article number to view the article in the Microsoft Knowledge Base:

322756 (http://support.microsoft.com/kb/322756/ )How to back up and restore the registry in Windows

a.       Log on to the system by using an administrative user account other than the user account that is experiencing the problem.

b.       Back up all data in the current users profile folder if the profile folder still exists, and then delete the profile folder. By default, the profile resides in the following location:

%SystemDrive%\Users\UserName

2

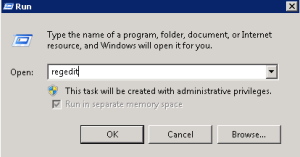
c.       Click Start, type regedit in the Start Search box, and then press ENTER.

3

If you are prompted for an administrator password or for confirmation, type your password, or click Continue.

d.       Locate the following registry subkey:

HKEY_LOCAL_MACHINE\SOFTWARE\Microsoft\Windows NT\CurrentVersion\ProfileList

e.       Under the ProfileList subkey, delete the subkey that is named SID.bak.

4

Note SID is a placeholder for the security identifier (SID) of the user account that is experiencing the problem. The SID.bak subkey should contain a ProfileImagePath registry entry that points to the original profile folder of the user account that is experiencing the problem:

5

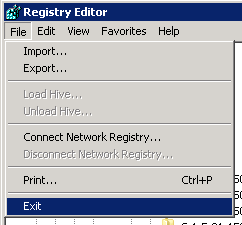
f.        Exit Registry Editor.

6


g.       Log off the system.

7

h.       Log on to the system again.

After you log on to the system, the profile folder is re-created and you should no longer receive this error message.  Please note I have experienced where this problem can return to the same machine, repeat the fix outlined above to resolve it, this is a workaround, not a permanent solution – we do what we can while working with Windows 🙂

SCCM 2012: Deployment and Infrastructure Technical Overview…

http://technet.microsoft.com/en-us/video/microsoft-virtual-academy-module-2-system-center-configuration-manager-overview-and-infrastructure-deployment-and-infrastructure-technical-overview

About This Video:  Understand the infrastructure changes coming in System Center Configuration Manager 2012 to simplify the configuration and management of the infrastructure. In this video you will learn about sites, distribution points, replication and integration with AD.

This video is part of the Microsoft Virtual Academy (MVA), www.microsoftvirtualacademy.com. The MVA is a free program delivering structured learning paths for IT Professionals on various Microsoft products and solutions.

Published Date: January 24, 2012

Presented By:     Microsoft Virtual Academy

Downloads

Video:                             WMV  MP4  WMV (ZIP) PSP

Exam-taking Hints and Tips…

Follow these hints to make your exam experience less stressful and more successful.

Before the Exam

  • Prepare      a short review sheet for the exam. It should contain reference tables and      information that you have trouble remembering. Shortly before you start      the exam, study your notes for a last-minute review.
  • Arrive      10 to 15 minutes early, and relax for a few minutes before the exam. Take      a deep breath. Look at the review sheet one last time. You will make fewer      mistakes if you are not tense and rushed.
  • Before      the actual exam begins, you will have the option to take an orientation      exam to familiarize yourself with the actual exam program. Take the      orientation before you take your first exam. The time you spend on the      orientation exam does not count toward the actual test time. If you have      any questions, ask the exam administrator before the exam begins. The      exams are timed, so don’t use any of your test time asking questions that      you could have asked earlier.

During the Exam

  • When      answering a question you are not sure of, eliminate the obviously      incorrect answers first. Eliminating the obvious makes it easier for you      to try to select the correct answer, and increases your chances of      selecting the correct answer if you have to guess.
  • If      you simply don’t know, guess! Be sure you answer all the questions before      you finish. Unanswered questions are wrong and scored as incorrect      answers. If you are unsure of an answer, make an educated guess. There is      no extra penalty for incorrect answers.
  • If      you have time, review your answers before going on to the next question. A      word of caution: be absolutely sure before you change an answer! If you      are positive that your answer is wrong, change it. But if you are not sure      and cannot explain to yourself why you need to change an answer, leave it.      Most of the time, your first instinct is correct.

Note: Remember, with an adaptive test, you cannot skip questions or go back to review previous questions. This means you will need to take the time to thoroughly read and understand each question. However, adaptive tests are also shorter, so you do not have to worry as much about running out of time.

Use Your Scratch Paper

  • You      will be given scratch paper and a pen to use during the exam. Some testing      centers provide paper and a pencil. Some provide laminated paper and an      erasable marker.
  • Right      after you start the exam, write down anything that could be a useful      reference during the exam. This is the time to remember what you studied      on your review sheet. The information on the review sheet should be fresh      in your mind because you just did a quick review. Write lists, reference      tables, and any other vital information on the paper. (Don’t spend a lot      of time here–just a minute or two writing down reference material.) The list      of information will save you time as you answer the questions.
  • Use      the paper to draw out permissions, domain diagrams, subnet masks, and so      forth. A question may be easier to answer after you see a diagram.

Case Studies

Case studies are more complex than scenario questions. With case studies, you are given a large case study and about 10 questions to answer regarding the case study. You can refer to the case study while answering questions. To help familiarize you with this type of question, applicable TestOut exams contain questions that follow this format. Here are some other tips to keep in mind.

  • Create      an optimal test-taking environment. Flickering monitors, noise, and      interruptions can cause you to lose concentration. Explain the nature of      the test to the testing personnel and ask to be placed in the best seat      possible. Be sure to use the restroom and eat before the exam. Case study      exams may take nearly four hours.
  • Pace      yourself. Although there are only forty questions, you will probably need      the entire testing time to consult the scenarios and decide your answers.
  • Understand      the way the question count works. On a 40 question exam, the question      count says Question 1 of 48 and so forth. Understand that each      Instructions and Case screen counts in the question total.
  • Look      first for exhibits. Before wasting time trying to diagram what a case is      trying to describe, look for an exhibit. There is not always an exhibit,      but if there is one, you can save a lot of time.
  • Be      conservative on your note taking. You could take a lot of unnecessary      notes and waste a lot of time while reading a scenario. It might be better      to read the scenario through, get oriented regarding where certain types      of information is located, and consult the specific parts of the scenario      and take more detailed notes as required to answer specific questions.      That said, you should still ask for extra paper and pencils because you      may need to take many notes.
  • Consider      the pros and cons of reading the questions first. Reading the questions      first can give you an idea of what to look for as you read the scenarios.      However, depending on the computer being used, it might take up to 6      seconds per click just to move from one question to another. Clicking      Next, then Back, then Next through every question can take a fair amount      of time. Also, it might be a better strategy to get an overview of the      scenario. Then consult specific parts of the scenario in more detail as      you read and answer each question.
  • Consider      the pros and cons of using the All tab. The All tab lists the content of      all the other tabs and radio buttons in a single scrollable document.      While it might be convenient to read everything in one place, it also      might be harder to orient yourself to the structure of the scenario and      relocate information when you need it. Consider becoming familiar with the      other tabs and radio buttons so you can more quickly find information you      are looking for (and decrease the use of the scroll bar).
  • Don’t      worry if the scenario lacks all the details, and in fact be grateful for      it. For example, if a scenario mentions that an organization has 20      buildings but only mentions subnet IDs for three of them, it is just that      much useless information you need to wade through to come up with an      answer for a question. In fact, it may indicate a clue regarding what to      focus on.
  • Be      tolerant with ambiguity. Sometimes it’s hard to figure out what Microsoft      is talking about. Try to tolerate the ambiguity and give it your best      guess rather than spending a lot of time trying to reason through what      does not seem reasonable. That said, if there is something you need to      reason through, spend the time to get it right.

Exam Retakes

  • If      you do not pass the exam, use the score report on your transcript to      identify areas needing further study.
  • As      soon as possible, think carefully about the exam and make notes about the      questions that you couldn’t answer. Look up the correct answers in your      study materials. You may get the same or similar questions the next time.
  • Don’t      wait too long to retake the exam. You already know much of the material,      and you may forget what you know if you wait too long.


How Do I Register for an Exam?

Exams are scheduled through Prometric and Pearson VUE. The number you call depends on the vendor that offers the exam (i.e. Microsoft, Novell, CompTIA, or Cisco). To register for a certification exam, call the number in the table that corresponds to the certification you want to receive.

Certification Provider Web site Phone Number
Microsoft Prometric http://www.prometric.com (800) 755-3926
CompTIA A+ Prometric
Pearson VUE
http://www.prometric.com
http://www.vue.com
(800) 77-MICRO (64276)
(877) 551-PLUS (7587)
CompTIA Network+ Prometric
Pearson VUE
http://www.prometric.com
http://www.vue.com
(888) 895-6116
(877) 551-PLUS (7587)
CompTIA Security+ Prometric
Pearson VUE
http://www.prometric.com
http://www.vue.com
(800) 977-EXAM (3926)
(877) 551-PLUS (7587)
Novell Prometric
Pearson VUE
http://www.prometric.com
http://www.vue.com
(800) RED-EXAM (733-3926)
(800) TEST-CNE (837-8263)
Cisco Pearson VUE http://www.vue.com (877) 404-EXAM (3926)

Inform the customer service representative that you need to register for an exam, and then supply the exam name and/or number. The customer service representative will ask you for the following information when you register:

  • ID      number (This is usually your Social Security Number.)
  • Mailing      address and telephone number
  • E-mail      address
  • Organization      or company name
  • Method      of payment (credit card number or check). Payment must be made in advance.      Certification exam prices are subject to change and depend on the specific      exam you are taking. Please contact your local testing center for exact      pricing.

Other important registration and cancellation information:

  • At the testing center, you must accept the terms of a non-disclosure agreement before you take your certification exam. You must also complete      a brief demographic survey.
  • You      can schedule exams up to six weeks in advance or just one working day      before the exam date. Be aware that the testing centers may be busy, so it      is best to call for scheduling a few days before you want to take an exam.      Same-day registration may be possible in some locations, if space is      available. You must register at least 30 minutes before test time.
  • You      can cancel or reschedule your exam, but you must contact the testing      vendor at least one working day before the exam.
  • If      you cancel, the exam must be taken within one year of payment. You may      receive a full refund at any time after registration and before taking an      exam. No refunds are given after you have taken an exam.

Exam FAQs…

Where Do I Take an Exam?

When you contact Prometric or Pearson VUE, ask the customer service representative for a list of locations near you. You can also find testing locations on the Web at http://www.prometric.com for Prometric, or at http://www.vue.com/ for Pearson VUE.


What Do I Take With Me to the Exam?

You will need two forms of identification, one with a picture. For example, you could use a driver’s license and a credit card. Be sure to arrive on time. Prometric recommends that you come 20 minutes early. You will be given a pen and scratch paper to use during the exam. Notes or other reference materials are not allowed inside the testing center.


What Specific Information Do I Need to Know to Pass the Exam?

People often ask, “What’s on the exam?”   In the end, you need to understand the concepts and tasks necessary to do your job. However, you should take advantage of online resources that provide practice exams in order to prepare for a certification exam.


What’s an Adaptive Test?

Some exams you might take will be in an adaptive format. An adaptive test begins by giving you an easy-to-moderate question. If you answer the question correctly, it gives you a more difficult question. With each correct answer, the difficulty of the questions increases. On the other hand, if you answer the second question incorrectly, the next questions will be easier. The test changes the question difficulty until it determines your skill level.

There are two primary characteristics you will notice as you take an adaptive exam.

  • You cannot skip questions or      review previously answered questions. This means you need to take a little      more time to answer each question carefully before going on to the next      question. (Adaptive exams display a warning screen at the beginning of the      exam stating that you will not be allowed to review previous questions.)
  • The tests are typically      shorter than the traditional exams. (The current adaptive exams range      between 15 and 35 questions.)


How Does the Exam Work?

Certification exams are all computer based. After entering your testing ID and selecting the test you want to take, you will have the chance to view a tutorial on the exam software. Time spent reviewing the tutorial does not count towards the time you have to take the exam.

After starting an adaptive exam, you cannot go back to exam questions that you skipped, so answer each question. Some tests may be available in both adaptive and traditional versions.


What Types of Questions Will I Be Asked?

Exam question types depend on the organization that publishes the exam. Common exam question types include the following:

  • Multiple-choice,      single-select (one correct answer)
  • Multiple-choice, multiple-select      (several correct answers)
  • Fill-in-the-blank
  • Case-study questions (read a      case study and answer questions)
  • Hot-spot question (click the      correct place on a graphic)
  • Simulation (perform the task)
  • Select-and-place question      (drag elements to place them)

Case-study questions present a detailed case study, then ask you to design, configure, or answer questions based on that information. They include a tree view, as well as questions that ask you to select and connect elements, or place elements in the correct order.

Hot-spot questions require you to examine one or more graphics or exhibits and click the graphic to indicate your response.

The majority of questions will be multiple-choice questions. If more than one answer is required for a single question, you will be told either to select a number of answers or to select all that apply.

A scenario question presents a scenario problem, requirements, and a solution, then asks you to determine and indicate which requirements the solution fulfills.

Simulation questions require you to perform actual configuration tasks in a simulated interface. Be sure to stop and restart IIS services when you configure them.

Select-and-place questions ask you to drag elements to their appropriate places on a graphic or table.


How Many Questions Are on an Exam and How Long Do I Have to Complete It?

The number of questions on the exam and the time limit depend on which test you are taking, and which format it is in. For up to date information, check the vendor Web site for the exam you want to take.

  • A traditional, nonadaptive      certification exam contains about 50-65 questions and allows you 90      minutes to complete the exam.
  • A short-form traditional      certification exam contains about 30 questions, and allows you 60 minutes      to complete the exam.
  • An adaptive exam contains      between 15-35 questions, and has varying time limits.
  • A case study exam contains      about four case studies with about 10 questions each. You usually have      between three and four hours to complete the exam.


How Soon After I Take the Exam Will I Know Whether I’ve Passed It?

As soon as you have answered all of the questions, select Finish Test to end the test. The testing program provides immediate feedback (it just feels like a thousand years) and automatically prints a report showing the required passing score and your score on the exam. Before leaving the testing center, be sure to pick up your exam report and have it validated by a Prometric or Pearson VUE representative. You should keep this report in case there are any discrepancies in your certification program.


I Didn’t Pass the Exam. What Do I Do Now? Can I Retake the Exam?

If you do not pass an exam the first time you take it, you may retake it at any time. Individual certifications might have varying rules about how quickly you can retake the exam. You need to pay for each exam that you take or retake.


Active Directory 2008: Exam Objectives for Exam 70-640 – Windows Server 2008 Active Directory, Configuring

This certification exam measures your ability to manage Windows Server 2008 Active Directory roles and features. Before taking the exam, you should be proficient in the skills listed below:

#

Objective

100

Configuring Domain Name System   (DNS) for Active Directory (17 percent)

101

Configure zones.
May include but is not limited to:

  • Dynamic DNS (DDNS),        Non-dynamic DNS (NDDNS), and Secure Dynamic DNS (SDDNS)
  • Time to Live (TTL)
  • GlobalNames
  • Primary, Secondary, Active        Directory Integrated, Stub
  • SOA
  • Zone scavenging
  • Forward lookup
  • Reverse lookup

102

Configure DNS server settings.
May include but is not limited to:

  • Forwarding
  • Root hints
  • Configure zone delegation
  • Round robin
  • Disable recursion
  • Debug logging
  • Server scavenging

103

Configure zone transfers and   replication.
May include but is not limited to:

  • Configure replication scope        (forestDNSzone; domainDNSzone)
  • Incremental zone transfers
  • DNS Notify
  • Secure zone transfers
  • Configure name servers
  • Application directory        partitions

200

Configuring the Active Directory   infrastructure (17 percent)

201

Configure a forest or a domain.
May include but is not limited to:

  • Remove a domain
  • Perform an unattended        installation
  • Active Directory Migration        Tool (ADMT)
  • Change forest and domain        functional levels
  • Interoperability with        previous versions of Active Directory
  • Multiple user principal name        (UPN) suffixes
  • Forestprep
  • Domainprep

202

Configure trusts.
May include but is not limited to:

  • Forest trust
  • Selective authentication vs.        forest-wide authentication
  • Transitive trust
  • External trust
  • Shortcut trust
  • SID filtering

203

Configure sites.
May include but is not limited to:

  • Create Active Directory        subnets
  • Configure site links
  • Configure site link costing
  • Configure sites        infrastructure

204

Configure Active Directory   replication.
May include but is not limited to:

  • DFSR
  • One-way replication
  • Bridgehead server
  • Replication scheduling
  • Configure replication        protocols
  • Force intersite replication

205

Configure the global catalog.
May include but is not limited to:

  • Universal Group Membership        Caching (UGMC)
  • Partial attribute set
  • Promote to global catalog

206

Configure operations masters.
May include but is not limited to:

  • Seize and transfer
  • Backup operations master
  • Operations master placement
  • Schema Master
  • Extending the schema
  • Time service

300

Configuring Active Directory Roles   and Services (14 percent)

301

Configure Active Directory   Lightweight Directory Service (AD LDS).
May include but is not limited to:

  • Migration to AD LDS
  • Configure data within AD LDS
  • Configure an authentication        server
  • Server Core installation

302

Configure Active Directory Rights   Management Service (AD RMS).
May include but is not limited to:

  • Certificate request and        installation
  • Self-enrollments
  • Delegation
  • Create RMS templates
  • RMS administrative roles
  • RM Add-on for IE

303

Configure the read-only domain   controller (RODC).
May include but is not limited to:

  • Replication
  • Administrator role separation
  • Read-only DNS
  • BitLocker
  • Credential caching
  • Password replication
  • Syskey
  • Read-only SYSVOL
  • Staged install

304

Configure Active Directory   Federation Services (AD FSv2).
May include but is not limited to:

  • Install AD FS server role
  • Exchange certificate with AD        FS agents
  • Configure trust policies
  • Configure user and group        claim mapping
  • Import and export trust        policies

400

Creating and maintaining Active   Directory objects (18 percent)

401

Automate creation of Active   Directory accounts.
May include but is not limited to:

  • Bulk import
  • Configure the UPN
  • Create computer, user, and        group accounts (scripts, import, migration)
  • Template accounts
  • Contacts
  • Distribution lists
  • Offline domain join

402

Maintain Active Directory   accounts.
May include but is not limited to:

  • Manage Computer Accounts
  • Configure group membership
  • Account resets
  • Delegation
  • AGDLP/AGGUDLP
  • Deny domain local group
  • Local vs. domain
  • Protected Admin
  • Disabling accounts vs.        deleting accounts
  • Deprovisioning
  • Contacts
  • Creating organizational units        (OUs)
  • Delegation of control
  • Protecting AD objects from        deletion
  • Managed service accounts

403

Create and apply Group Policy objects   (GPOs).
May include but is not limited to:

  • Enforce, OU hierarchy, block        inheritance, and enabling user objects
  • Group policy processing        priority
  • WMI
  • Group policy filtering
  • Group policy loopback
  • Group Policy Preferences        (GPP)

404

Configure GPO templates.
May include but is not limited to:

  • User rights
  • ADMX Central Store
  • Administrative templates
  • Security templates
  • Restricted groups
  • Security options
  • Starter GPOs
  • Shell access policies

405

Deploy and manage software by   using GPOs.
May include but is not limited to:

  • Publishing to users
  • Assigning software to users
  • Assigning to computers
  • Software removal
  • Software restriction policies
  • AppLocker

406

Configure account policies.
May include but is not limited to:

  • Domain password policy
  • Account lockout policy
  • Fine-grain password policies

407

Configure audit policy by using   GPOs.
May include but is not limited to:

  • Audit logon events
  • Audit account logon events
  • Audit policy change
  • Audit access privilege use
  • Audit directory service        access
  • Audit object access
  • Advanced audit policies
  • Global object access auditing
  • “Reason for Access”        reporting

500

Maintaining the Active Directory   environment (18 percent)

501

Configure backup and recovery.
May include but is not limited to:

  • Using Windows Server Backup
  • Back up files and system        state data to media
  • Back up and restore by using        removable media
  • Perform an authoritative or        non-authoritative Active Directory restore
  • Linked value replication
  • Directory Services Recovery        Mode (DSRM)
  • Back up and restore GPOs
  • Configure AD recycle bin

502

Perform offline maintenance.
May include but is not limited to:

  • Offline defragmentation and        compaction
  • Restartable Active Directory
  • Active Directory database        mounting tool

503

Monitor Active Directory.
May include but is not limited to:

  • Event viewer subscriptions
  • Data collector sets
  • Real-time monitoring
  • Analyzing logs
  • WMI queries
  • PowerShell

600

Configuring Active Directory   Certificate Services (15 percent)

601

Install Active Directory   Certificate Services.
May include but is not limited to:

  • Certificate authority (CA)        types, including standalone, enterprise, root, and subordinate
  • Role services
  • Prepare for multiple-forest        deployments

602

Configure CA server settings.
May include but is not limited to:

  • Key archival
  • Certificate database backup        and restore
  • Assigning administration        roles
  • High-volume CAs
  • Auditing

603

Manage certificate templates.
May include but is not limited to:

  • Certificate template types
  • Securing template permissions
  • Managing different        certificate template versions
  • Key recovery agent

604

Manage enrollments.
May include but is not limited to:

  • Network device enrollment        service (NDES)
  • Autoenrollment
  • Web enrollment
  • Extranet enrollment
  • Smart card enrollment
  • Authentication mechanism        assurance
  • Creating enrollment agents
  • Deploying multiple-forest        certificates
  • x.509 certificate mapping

605

Manage certificate revocations.
May include but is not limited to:

  • Configure Online Responders
  • Certificate Revocation List        (CRL)
  • CRL Distribution Point (CDP)
  • Authority Information Access        (AIA)


Active Directory 2008: Active Directory Monitoring Tools Facts…

The table below describes tools that you can use to monitor and manage Active Directory.

Tool Description
RepAdmin Repadmin (Replication Diagnostics   Tool) is a command-line tool that you can use to diagnose replication   problems between Windows domain controllers. The following list shows some of   the common switches used with Repadmin

  • Use /showrepl to show        the replication partners of a domain controller.
  • Use /replicate to        force replication between two domain controllers. List the target system        first, followed by the source system.
  • Use /syncall to force        replication between all domain controllers in a site.
  • Use /showchanges to        view unreplicated changes on a domain controller. You can export this        information to text file, run the command again at a later time, and        then compare the results.
  • Use /showconn to show        connection objects.
  • Use /replsummary to        view the replication status for all domain controllers in the forest.        The output lists each domain controller with status information.
  • Use /showattr to see        the attributes of an Active Directory object.

You can launch Repadmin from the   command prompt or through its link in the Advanced Tools section of the AD DS   server role in Server Manager.

ReplMon Replmon (short for Active   Directory Replication Monitor) is a GUI-based tool that you can use to   perform tasks similar to those performed by RepAdmin. In addition, use   ReplMon to view a graphical representation of the Active Directory   replication topology.
Group Policy Results The Group Policy Results wizard   allows you to determine the current, cumulative effects of Group Policy   settings that apply to a specific user or computer.

  • When you run the wizard, you        select a computer and a user.
  • The computer you select must        be turned on. The utility contacts the destination computer and queries        it for effective Group Policy settings. The destination computer must        run Windows XP Professional or later.
  • You can only select a user        account that has been used to log on to the target computer. Group        Policy Results creates a report based on the answers you supply during        the wizard. The report shows the resultant set of policy for the user        and computer you entered in the wizard.
  • Gpresult.exe is the command line version        of Group Policy Results.

This feature used to be referred   to as Resultant Set of Policy (RSoP) logging mode.

Group Policy Modeling The Group Policy Modeling wizard   allows you to calculate the effects that GPOs have on your system before you   deploy the GPOs.

  • When you run the wizard, you        select a domain controller in a domain. The domain controller must be        running Windows Server 2003 or later.
  • You can select a target OU,        computer, or user account.
  • You can choose to include or        exclude items from the analysis. For example, you can include or exclude        specific WMI filters that have been applied, loopback processing, or        GPOs linked to sites.
  • You can analyze the effects        of moving a user or computer to a different OU, changing group        memberships, or the application of Group Policy over slow links.
  • After working through the        wizard, the answers you supplied are displayed in a report as if they        were from a single GPO and saved as a query represented by a new item        under the Group Policy Modeling node.

This feature used to be referred   to as Resultant Set of Policy (RSoP) planning mode.


Active Directory 2008: System Monitoring Tools Facts….

The table below describes tools that you can use to view and monitor system events and information.

Component Description
Event Viewer Use Event Viewer to view system   and error messages generated by the operating system and other programs.   Through Event Viewer, you can:

  • View events from multiple        event logs.
  • Save useful event filters as        custom views that can be reused.
  • Attach a task to an existing        instance of error to notify you of when a particular error occurs. This        is useful if you notice an error that occurs in random intervals.

With Event Viewer you can collect and view a set of events   stored in multiple logs on multiple computers through event subscriptions.   When you create an event subscription, events are sent from the source   (or forwarder) computer (the computer where the event is generated) to   the collector computer (the computer where the events are sent).

  • Collector initiated        subscriptions create an event subscription for all source computers,        inform the source computers of the subscription, and then receive the        events on the collector computer. This type is best if you know all the        event source computers that will forward events. Be aware of the        following before configuring the collector initiated subscription type:
    1. On the source computer, run         the winrm qc command to run WinRM.
    2. On the source computer, add         the collector computer account to the local Administrators group. In a         workgroup, you must also add a user account with administrative         privileges to the Event Log Readers group.
    3. On the collector computer,         run the wecutil qc command to run Wecsvc.
      Note: You must also run winrm qc on the collector if the         collector is to use delivery optimization options other than normal.
  • Source initiated        subscriptions define an event subscription on a collector computer        without identifying each source computer. This type is best for        environments where the source computers are managed using Group Policy.        Be aware of the following before configuring the source computer        initiated subscription type:
    1. On the source computer, run         the winrm qc -q command to run WinRM.
    2. On the source computer,         configure and enable the Event Forwarding policy through Group Policy         or the local security policy, and specify the collector computer’s         FQDN.
    3. On the collector computer,         run the winrm qc -q command to run WinRM.
    4. On the collector computer,         run the wecutil qc /q command to run Wecsvc.
    5. In Active Directory or on         the collector computer, add the source computers to a computer group         that identifies the source computers.

To manage logs and read events from the command prompt,   use Wevtutil.

Network Monitor Network Monitor is a protocol   analyzer. Use Network Monitor to capture, view, and analyze network traffic.   Network Monitor offers the following features:

  • Network Monitor captures        packets (or packet fragments) and their contents.
  • You enable packet capturing        on specific network interface cards. When enabled on a NIC, Network        Monitor captures all traffic sent to and from that NIC.
  • You can use the p-mode        (promiscuous mode) to capture all packets regardless of the destination        MAC addresses.
  • Configure filters to        specify packets to display or capture.
    • A display filter         shows only the packets specified by the filter. Using a display filter         does not affect the data that is in the capture file.
    • A capture filter         captures only the packets specified by the filter. If the packet type         you are looking for is not in the capture file after using a capture         filter, you must reconfigure the filter and recapture.
  • Nmcap.exe is the command-line version        of Network Monitor.
  • You must run Network Monitor        as an administrator or as a member of the Netmon users group.
Task Manager In Task Manager you can see   programs, processes, and services that are currently running on your   computer. Press Ctrl + Alt + Delete to start the Task   Manager. Task Manager displays data in the following tabs:

  • The Applications tab        allows you to view and, if needed, stop each running application.
  • The Processes tab        displays each running process, memory resources in use, and a short        description.
  • The Services tab        displays each service needed to run active processes and        applications.
  • The Performance        tab graphs CPU and memory usage.
  • The Networking tab        allows you to view the percentage of available network bandwidth your        computer is currently using.
  • The Users tab displays        each user that is currently logged in to the computer and their login        method. You can disconnect users if needed.
Windows System Resource Manager Windows System Resource Manager   (WSRM) allows you to control how CPU and memory resources are allocated to   applications, services, and processes on the computer. This prevents one   application from consuming more than its allotted CPU and memory limits and starving   other applications of CPU and memory. You can run WSRM through the Wsrm   snap-in or from the command line with the wsrm command.
Performance Monitor Performance Monitor is a real-time   visual display of a PC’s overall performance. You track performance by using objects   and counters:

  • An object is a        statistic group, often corresponding to a specific type of hardware        device or software process (such as a physical disk or processor        statistics).
  • A counter is a        specific statistic you can monitor. For example, for the PhysicalDisk        object, you can monitor counters such as %Disk Read Time or %Idle Time.

Be aware of the following:

  • Performance Monitor shows        real-time statistics.
  • You can customize the        statistics you want to view.
  • You can save the current        statistics, but you cannot use Performance Monitor to capture data over        long periods of time.
  • Performance Monitor displays        data in the following forms: line graph, histogram, report (text).
Data Collector Sets (DCS) A Data Collector Set (DCS) is a   group of objects and counters that can be used to capture system performance   statistics over a period of time. A Data Collector Set includes one or more   data collectors, which identify the specific objects and counters you want to   track. There are four types of data collectors, and you can also create your   own.

  • Use a performance counter        data collector to save system statistics over time in a log. Logs can be        saved to different log formats:
    • Use text files (comma or tab         delimited) to import data into a spreadsheet program.
    • Use binary files to save         data that is intermittent. Select a circular file to save all data into         a single file, overwriting the contents when the log is full.
    • Use SQL database files to         import statistics into SQL server in order to perform data comparisons         or data archival.
  • Use an event trace        data collector to capture events logged by software processes.
  • Use a configuration        data collector to monitor the state and changes to registry keys.
  • Use a performance counter alert        to configure triggers that take an action when a counter reaches a        threshold value. When you configure an alert you specify:
    • The counter you want to         watch.
    • A threshold limit (a counter         value that you want to watch for).
    • An action to take when the         threshold value is reached. For example, you can write an event to a         log, send a message, or run a program.
Reliability Monitor Reliability Monitor maintains   historical data describing the operating system’s stability.

  • Run perfmon /rel to        open Reliability Monitor from the command prompt.
  • Data is stored daily and        displays a Stability Index from 1 to 10 on the following events:
    • Software installs/uninstalls
    • Application failures
    • Hardware failures
    • Windows failures
    • Miscellaneous failures
    • Operating system patches
    • Operating system driver         installations
  • Details for each instance are        displayed below the System Stability chart.
    • Warning icons indicate a         failure.
    • Information icons indicated         a successful event.
    • Error icons indicate a         failure.
  • The Stability index value is        calculated over the last 28 days of the system. The Stability index does        not calculate days that the computer is turned off, sleeping, or        hibernating.
  • Recent failures are weighted        more heavily than past failures so that improvement over time is        reflected in an increasing stability index when a reliability issue has        been resolved.

Reliability Monitor is disabled by default in Windows   Server 2008 R2. To enable Reliability Monitor:

  1. Enable the One time        trigger in the RacTask task in Task Scheduler.
  2. Edit the HKEY_LOCAL_MACHINE\SOFTWARE\Microsoft\Reliability        Analysis\WMI\WMIEnable registry entry.
  3. Restart the machine.
Resource Monitor The Resource Monitor displays   real-time information about the resources used by the installed hardware and   software.

  • Use resmon.exe or perfmon        /res to start the Resource Monitor.
  • While you can use Task        Manager to view the CPU and memory used by a service or a process, use        Resource Monitor to view additional details about resources and        activities for those processes. You can filter results according to the        processes or services that you want to monitor. Selecting a process (to        filter on the process) shows only the statistics for that process on all        tabs.
  • A process wait chain        includes all of the applications which are waiting for other processes        to finish. To view the process wait chain, right-click the name of the        process, then click Analyze Wait Chain.
  • A process that is not        responding appears as a red entry in the CPU table.
  • Resource Monitor starts with        the display settings saved from the previous session. Save the display        state for future sessions. Filtered selections are not saved as part        of the configuration settings.

When monitoring Active Directory-related events, be aware of the following:

  • The      Directory Services object includes multiple counters to monitor Active      Directory. This object includes counters for:
    • The Directory Replication Agent (DRA) to monitor       replication events such as the number of inbound/outbound packets or       objects, and pending replication operations.
    • Directory Service (DS) events, such as reads and       writes from various databases.
    • LDAP calls, including client sessions, connections,       and searches.
    • Security Account Manager (SAM) operations.
  • The      following trace collectors record information related to Active Directory:
    • Active Directory Domain Services: Core
    • Active Directory Domain Services: SAM
    • Active Directory: Kerberos Client
    • Active Directory: Kerberos KDC
  • You      can use the preconfigured Active Directory Diagnostics data collector set      to monitor common events related to Active Directory. The Active Directory      Diagnostics data collector set includes the following collectors:
    • NT Kernel and Active Directory trace collectors to       capture events logged by these processes.
    • A performance counter that monitors all counters       related to the following objects: directory services, physical disk,       processor, memory, network interface, TCP and UDP, IPv4 and IPv6, and       others.
    • AD Registry configuration collector, to monitor       changes to the registry related to Active Directory.


Active Directory 2008: Offline Defragmentation Facts…

Offline defragmentation is the process of taking the Active Directory database offline, reorganizing the data within the database to make it more efficient, and returning unused disk space to the operating system.

  • Online defragmentation occurs automatically   (by default every 12 hours) when garbage   collection runs. However, free space remains   within the database file and is not returned   to the system for use.
  • Over time, the size of the database can grow   to be much larger than the size of the   objects   within the database.
  • The only way to return unused space from   the directory database to the file system   is through offline defragmentation.

To perform offline defragmentation, you run Ntdsutil to compact the database file to an alternate location, then copy the compacted file back to its original location in the %systemroot%\NTDS folder. Use the following steps:

  1. Stop the AD DS service by stopping the Active   Directory Domain Services service in the   Services console. (Restarting the domain   controller in Directory Services Restore   Mode is not required.)
  2. Open a command prompt as an administrator.   Run Ntdsutil with the compact command. This copies the database file to   a different location. As it copies, free   space is removed from the database file.   Use the following commands to compact the   database:
    ntdsutil
    activate instance ntds
    files
    compact to <path>
      quit
    quit
  3. Delete any log files saved in the %systemroot%\NTDS directory.
  4. As a precaution, copy the existing Ntds.dit   file to a new location.
  5. Copy the compacted file you created in step   2 to the %systemroot%\NTDS directory.
  6. You can verify the integrity of the new file   using the following commands:
    ntdsutil
    activate instance ntds
    files
    integrity
    quit
  7. If all checks pass, restart the Active Directory   Domain Services service. If the checks fail,   you can copy the Ntds.dit file back from the alternate location.

If you want to move the log or database files, use the move command with Ntdsutil. Using the move command updates the registry with the new file location. Do not simply copy the files to a different location. The following commands show an example:

Ntdsutil
activate instance ntds
files
move db to <path>
or move logs to <path>

Note: Use these same commands and processes to manage database files on an AD LDS installation. To stop the AD LDS instance, stop the service that was created during the instance installation.